Hi,
This is a follow on to my previous restoration:
viewtopic.php?f=102&t=9654
This time, I am restoring one in Candy Glory Red so will have a matching pair.
I have gone about this restoration in much the same way, so won't duplicate things - will focus on bike specifics or anything new I have found along the way.
Paul.
CBX 1000Z Restoration - Candy Glory Red this time!
-
jnnngs
- ICOA Member

- Posts: 420
- Joined: Tue Feb 10, 2015 2:05 pm
- Location: Hants/UK
- Location: Hants/UK
-
jnnngs
- ICOA Member
- Posts: 420
- Joined: Tue Feb 10, 2015 2:05 pm
- Location: Hants/UK
- Location: Hants/UK
Re: CBX 1000Z Restoration - Candy Glory Red this time!
The Starting Point
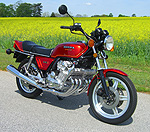
I bought the bike around June 2015. It was a running bike but hadn't been used for about a year. It had 57,000 miles on it, and was in reasonable original condition: The intention was to put it back to as original as possible. I started on it in early September, and all being well will finish it by the end of year - just started putting it back to together.
Paul.
You do not have the required permissions to view the files attached to this post.
-
jnnngs
- ICOA Member
- Posts: 420
- Joined: Tue Feb 10, 2015 2:05 pm
- Location: Hants/UK
- Location: Hants/UK
Re: CBX 1000Z Restoration - Candy Glory Red this time!
The Engine
The engine has 57,000 miles on it, and the previous owner had replaced the rings, and put new primary and cam chains on it. An initial compression test showed all cylinders being around 170 PSI (hot engine), so wasn't expecting any problems. The engine also has a later prolink complete cylinder head on it - was told it came off a "school, bike".
So far:
- Top end stripped
- Cylinder head and block vapour blasted
- crank cases, block and head all painted
- bores / pistons / rings all looked OK, so left as is
- head / cams / valves looked OK. Lightly lapped the valves on re-assembly.
- valve clearances all set to 0.1mm The cylinder head has the prolink cams in it. I believe these are a different profile to the Z, not sure how this will impact carburation - carbs are standard Z.
Note I painted the block / head this time - as per previous thread on this subject! Not sure it makes a lot of difference either way.
Paul.
You do not have the required permissions to view the files attached to this post.
Last edited by jnnngs on Sun Dec 06, 2015 7:38 am, edited 1 time in total.
-
jnnngs
- ICOA Member
- Posts: 420
- Joined: Tue Feb 10, 2015 2:05 pm
- Location: Hants/UK
- Location: Hants/UK
Re: CBX 1000Z Restoration - Candy Glory Red this time!
Zinc Plating
I re-plated the majority of fasteners / brackets back to their original silver / yellow / black.
Last time, I plated items such as carb mounting clamps in "olive Drab". Having looked at NOS items, I came to the conclusion that they were originally black, but over time they fade to look like "olive drab", so this time have plated them black. To be honest, there's not that much of a difference in the two colours.
As before, after plating you need to check threads / items with tight clearances that they still fit OK.
Paul.
You do not have the required permissions to view the files attached to this post.
-
tevan
- ICOA Member
- Posts: 707
- Joined: Sun Apr 25, 2010 8:47 am
- Location: Charleston, Illinois, USA
- Location: Charleston, Illinois, USA
Re: CBX 1000Z Restoration - Candy Glory Red this time!
I read where you put a prolink head on this bike. Was the black paint hard to remove? What did you use to remove it? Aircraft stripper?
-
jnnngs
- ICOA Member
- Posts: 420
- Joined: Tue Feb 10, 2015 2:05 pm
- Location: Hants/UK
- Location: Hants/UK
Re: CBX 1000Z Restoration - Candy Glory Red this time!
It had already been stripped / painted silver when I got the bike so I am not sure how the black finish was removed. Vapour blasting or aircraft stripper would have removed I am sure.tevan wrote:I read where you put a prolink head on this bike. Was the black paint hard to remove? What did you use to remove it? Aircraft stripper?
Paul.
-
daves79x
- ICOA Technical Director

- Posts: 4760
- Joined: Sun Oct 01, 2006 8:05 am
- Location: Knox, PA
- Location: Knox, PA
Re: CBX 1000Z Restoration - Candy Glory Red this time!
Looking very nice! Is this an early engine with smooth studs? Not a problem at all, IMHO, just wondering how early the engine/frame are?
Dave
Dave
-
jnnngs
- ICOA Member
- Posts: 420
- Joined: Tue Feb 10, 2015 2:05 pm
- Location: Hants/UK
- Location: Hants/UK
Re: CBX 1000Z Restoration - Candy Glory Red this time!
Frame is CB12013535, and Engine is CB1E2013689, so have the spiral studs. Production date was around Oct '78, but wasn't registered in the UK until early 1981.daves79x wrote:Looking very nice! Is this an early engine with smooth studs? Not a problem at all, IMHO, just wondering how early the engine/frame are?
Dave
Paul.
-
Z Grand
- ICOA Member
- Posts: 384
- Joined: Sun Jun 28, 2009 7:06 pm
- Location: Walnut Grove, Georgia, USA
- Location: N. Georgia, USA
Re: CBX 1000Z Restoration - Candy Glory Red this time!
I sure envy you guys with mechanical abilities. If you can't fix it with a rag and some metal polish, I'm usually lost.
-
mike209
- ICOA Member
- Posts: 100
- Joined: Thu Dec 13, 2012 9:23 pm
- Location: Long Island, NY
- Location: Long Island
Re: CBX 1000Z Restoration - Candy Glory Red this time!
I had a bunch of parts plated black and they turned olive after just two months.I came to the conclusion that they were originally black, but over time they fade to look like "olive drab", so this time have plated them black. To be honest, there's not that much of a difference in the two colours.
Really nice job Paul, have you considered recreating original stamping on the engine?
-
jnnngs
- ICOA Member
- Posts: 420
- Joined: Tue Feb 10, 2015 2:05 pm
- Location: Hants/UK
- Location: Hants/UK
Re: CBX 1000Z Restoration - Candy Glory Red this time!
Do you mean the build date info on the back of the crank cases? Would be nice to keep / put that back, but not thought about doing it so far!mike209 wrote:
Really nice job Paul, have you considered recreating original stamping on the engine?
Paul.
-
wyly

- ICOA Member
- Posts: 1727
- Joined: Tue Oct 30, 2007 4:20 pm
- Location: calgary alberta canada
- Location: Calgary Canada
Re: CBX 1000Z Restoration - Candy Glory Red this time!
if a man put it together, another man(you) can take it apart...Z Grand wrote:I sure envy you guys with mechanical abilities. If you can't fix it with a rag and some metal polish, I'm usually lost.
with a service manual and the combined CBX brain power of this forum you can do just about anything...I'm finding things that I found very intimidating before(CARBS)
CBX a work in progress, still improving...GS1150EFE completed and awaiting modifications.....RD350, remnants in boxes scattered throughout the garage
-
jnnngs
- ICOA Member
- Posts: 420
- Joined: Tue Feb 10, 2015 2:05 pm
- Location: Hants/UK
- Location: Hants/UK
Re: CBX 1000Z Restoration - Candy Glory Red this time!
Carbs
Carbs ready to go:
- carb bodies and bowls vapour blasted
- all brackets re-plated
- carb tops polished
- pilot jets extracted
- carb bodies / jets etc. cleaned in ultrasonic cleaner
- rebuild kit from Old School Carbs
- bench synched
- leak down tested
- (followed Mike Nixon's book)
Turned out OK: A few things caught me out:
- One of the carbs leaked when I did the leak down test. Turned out to be a cracked stand pipe - should have looked at them more carefully! Soldered it up to fix it.
- One of the accelerator nozzles wouldn't unblock. Tried the trick of putting rubber bungs each side of the body and using hydraulic pressure - nothing came out of the nozzle, but started to see fluid coming out where the nozzle was seated! Eventually cleared it by poking with thin guitar wire - taped a piece to the end of a screwdriver to come at it from the other side of the body.
- on final checks, noticed the choke plates on one bank of carbs weren't closing properly. Had just about resigned myself to having to break the rack up, when I tried loosening all the carb brackets / stays on that side - that cleared it.
Paul.
You do not have the required permissions to view the files attached to this post.
-
jnnngs
- ICOA Member
- Posts: 420
- Joined: Tue Feb 10, 2015 2:05 pm
- Location: Hants/UK
- Location: Hants/UK
Re: CBX 1000Z Restoration - Candy Glory Red this time!
Red Dots
So why do the brake master cylinders / calipers have red dots on them?
Anyway, decided to put them back on the newly painted parts:
Paul.
So why do the brake master cylinders / calipers have red dots on them?
Anyway, decided to put them back on the newly painted parts:
Paul.
You do not have the required permissions to view the files attached to this post.
-
jnnngs
- ICOA Member
- Posts: 420
- Joined: Tue Feb 10, 2015 2:05 pm
- Location: Hants/UK
- Location: Hants/UK
Re: CBX 1000Z Restoration - Candy Glory Red this time!
Rolling Chassis
Starting to look like a bike now: For the wheels, tried to get original look:
- anodising removed using oven cleaner (as per previous suggestion from CopperCollar)
- all marks removed using wet and dry paper (on both rim and spokes this time around)
- finished with 1000 grit paper, and then lightly polished with autosol.
Paul
You do not have the required permissions to view the files attached to this post.