daves79x wrote:You pretty much got it Nils. Detail on the wet testing - do yourself a favor and buy a 'T' and 3 feet of 5/16 fuel line. Fashion up a by-pass for the vacuum valve so that you can run gas straight into the carbs via the 2 inlets. Otherwise, you need a vacuum source to open the valve.
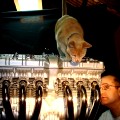
I have just fixed everything up for the leak testing per your advises. Dave, I have bypassed the vacuum as you recommended and I used the fuel tank from my Suzuki, since it always is in use and has fresh fuel, so I eliminate any potential problems with the old fuel tank. As soon as I dumped fuel into the carbs, I could not determine leaks through the gaskets, however I had to shut if off pretty much immediately as fuel started pouring out of these nozzles you can see on picture below. Unfortunately I had to rush to work, so didn't have much time to examine this, but I believe these might be overflow's not shutting properly or something...? Please kindly take a look and let me know what you guys think.
Kind regards,
Airborne
You do not have the required permissions to view the files attached to this post.
Don't you hate it when work gets in the way of the hobby.
Hard to tell from that pic but are the carbs sitting level? It looks like they are tilted which could affect float levels.
You are correct, they are tilted as they would be when placed back on the engine. I was advised to tilt them just like they would be on the engine... I have a feeling there is a problem with floats but I literally do not know what as I placed them perfectly the same like it was before I took it off. Also, hard to believe they would all leak, rather than just a few...
I will try to open it again and take a pic of how I assembled the floats for your assessment.
You very likely have dirty/sticking float valves, and possibly cracked standpipes in some bowls. Your phrasing of the description/questions about your observed leaks tells me that you might need to really learn how fuel enters the bowls, how it is supposed to shut off and how to check each of those components. I'm guessing you didn't pay a lot of attention to these details. I fear you have a lot more work to do. A persistent newbie can eventually get it, but be prepared for more frustrations until you get the leaks stopped, and likely more when you fire it up. You may have read here that it commonly takes 3 tries for the newbies to get it close to right and there are many here that can attest to that. Not for the faint of heart, but I'll help you all I can, most likely is going to require some time spent on the phone.
You are very correct, I am no expert whatsoever, I have never done CBX carbs before and they only bike I have ever worked before was my suzuki gsxf, popularly considered a crotch rocket. I do have a will to do it and do it right for my father, hence I am here and would love to learn from you as much as possible.
I thought there was a problem with floats when I saw the leak, especially through all the nozzles, which would indicate an incorrect installation, however I am certain I have installed the floats correctly. I will open the carbs today and will take a close up photos of a few floats (they all leak regardless) to let you see if there is any damage and to examine whether my installation was improper and hopefully we will find the source of the problem.
Once again, thank you for your patience and support on this!
Just as promised, I opened one of the leaking carbs and I photographed every part of the float. Upon visual inspection, everything seems to be just fine. Please send me any comments that you may have.
Kind regards,
Airborne
You do not have the required permissions to view the files attached to this post.
Sorry you are having challenges with your carbs, but pls rest assured we will prevail. A few comments...
1. Check to make sure your float levels are all set to as close to 15.5 mm as possible. Mike Nixon's book has how to measure it I think. This is VERY important. It is measured from the flat float bowl gasket mating surface on the carb body (not the float bowl) to the top edge of the float. I find it best to have the carbs tilted on the side to do the measurement so the float is only just 'kissing' the tip of the float valve plunger. If you do it with the carbs upside down, the weight of the float can depress the plunger on the float valve and give false readings / measurements. Adjust by bending the tang on the float valve VERY gently. The key here is a little tweak goes a LONG way.
2. On all my carb rebuilds I remove the float valve seats from the body of the carb. Get some brasso or good liquid metal polish and raid your partners make up cupboard (or your own?) for a dozen or so Q tips or cotton buds. Put the metal polish on the end of the Q tip and insert it into the float valve seat where the float needle goes. Spin it around, back and forwards many times to polish up the lip where the rubber tip of the float needle valve rests (and hopefully seals) on the brass float valve body. When done, polish with a clean Q tip and then blow out with carb cleaner. The lip of the hole should be nice and shiny and clean with no corrosion. Again the key here is to be gentle. Avoid temptation to use a power drill to spin the Q Tip or cotton bud.
3. Another idea,esp. if the float needles have been out for a long time is to soak them overnight in fuel. The rubber can go hard if exposed to atmosphere for a long time.
4. Be sure to have the alloy sealing washer installed under the float valve body when it screws into the carb body and the little gauze tube /filter thingy is installed on each of them.
5. And if, after doing all the above, you STILL have fuel leaking out the bottom of the bowl, this suggests the vertical brass overflow pipe in the float bowl itself has a hairline crack. Can be really hard to see, esp. with older eyes, but a magnifying glass may reveal a "Eureka!" moment. I had one of those happen and it can be a bugger to see but quickly and easily repaired with solder.
Don't even think about installing the carbs on your bike until they pass an overnight leak test. I assume you know which individual carbs are misbehaving - or is it all of them?
Your floats are correct and likely close enough in height to spec, but no photo can capture this - I'll walk you through that check if you want. Two important things - do the little plungers on the float needles depress and snap back freely and equally? If not, junk the ones that don't. Carefully check the others for imperfections in the rubber tip and in the brass seat. I'm guessing there is some residue in the seats by the looks of the one in the pic. Q-Tips and Berryman's carb cleaner there.
Then check the brass standpipes in the bowls. Shine them up and check for cracks - very common. Solder the cracks or drill out and replace the pipe. Note how the drain system works from the standpipe (overflow), to the normal drain process at the drain screw.
Get replacement float needles at the website I've referenced here a thousand times.
Thank you kindly for your advice and as always invaluable input. I opened the one float to send you pictures and examined the seat and everything you told me to do and could not see anything wrong with it. As I decided to polish all of them and see what happens, I had eureka moment when I opened them all. Please find a picture attached. All but one float were not set right and I have no clue how I could have missed it! I verified with the original CBX engine manual (not owners manual) and as you have stated, it has the same spec. It explains probably why I missed it, foolishly not checking it with the specs, I set it exactly how they were set previously, which means they must have been set wrong from the very beginning. I don't know how would that happen if no one ever did carb job on this bike, except maybe someone did in the past...I don't know, but I'm glad I have found it now, as setting them right will not be too hard. I will still polish the seats, when I'm at it and will keep you updated once the job is done and when I attempt the second test. Had a little bit of a delay as my suzuki needed some attention this week!
Thank you once again and I will keep you posted!
Kind regards,
Airborne
You do not have the required permissions to view the files attached to this post.
I would be very careful - it looks to me like a couple of your springy float pins are stuck down and giving you false float levels. Recall me asking if those spring pins were all completely free and snapped out when depressed? DO NOT attempt to adjust the floats until you verify proper float valve operation.